
Many Canon PowerShot S40 (other models as well) seem to be plagued by a common problem: the buffer battery that keeps the date/time, during the replacement of the main battery pack, has bad contacts. That leads to the loss of the user configurations every time you swap a power pack. That is, the camera is reset to factory state. Here I explain how to mend the problem.
This procedure was first written long ago. When possessing dozens of electronic gadgets was not the norm, when phones did not have a camera, and two digital cameras in the same household were considered extravagant, to say the least. Therefore there is no hands-on youtube-like photographic depiction of each step you should be performing. There are no pictures of the S40 innards either. I hope it'll be clear all the same.
Pointing the camera to you, the sliding door is more or less on the right hand side and the zoom controller is on the left. The battery is located roughly under the zoom controller half way to the bottom.

The battery is of the button type and is actually placed on a socket screwed on the front part of the camera shell. It's the only part that, once you open the camera, is placed on the shell. All the rest is screwed on an internal frame.
To access the button battery you need to remove the front part of the shell, taking care not to tear apart the flexible printed circuit (like a thin cable) that connects the battery to the rest of the camera.
Start removing the battery pack and the CF card, then remove the screws from the bottom. Mark or number the screws while you remove them: they are not all of the same type (in fact, screw 1, 2, and 7 are longer than the others).
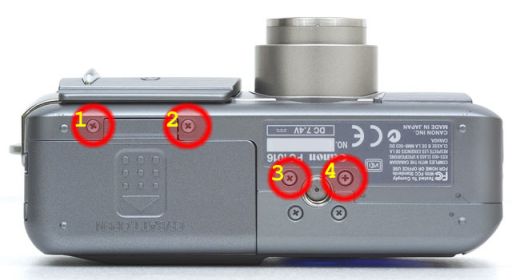
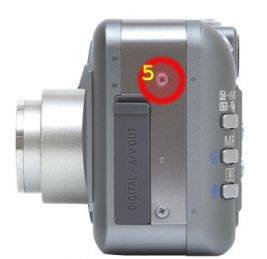
Then continue removing the screw on the right hand side.
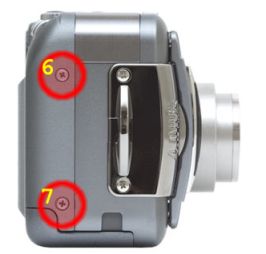
And finish with the screws on the left hand side.
To remove the front shell is now a matter of, slowly and very carefully, lifting this part from the rest of the camera. The tiny dot-like depressions you can notice around the camera are made to give a tighter fitting of the parts without recurring to screws, therefore it may be tricky to get the shell apart.
Don't be tempted to remove all the screws and remove all the three parts of the shell (as I did to find the battery), as this will loosen small parts that can be difficult to reassemble. You may need to hinge around the shell; do it with moderation and possibly with your finger nails or a plastic object.
If you really have to remove the back part to get parts loosen, reassemble it as soon as you get the front shell removed as that would expose the delicate LCD.
Once you get the front shell apart you'll notice that on its inside
surface there is the ON/OFF switch (operated by the sliding door)
and a round socket containing a MS614F lithium battery.
To remove it without causing a short circuit I'd recommend a plastic
needle. If you don't happen to have one, use a metal type taking
care you don't cause short circuits that may permanently ruin the
battery.
The battery is placed upside down (with the positive pole facing up) and there are some golden contacts all around.
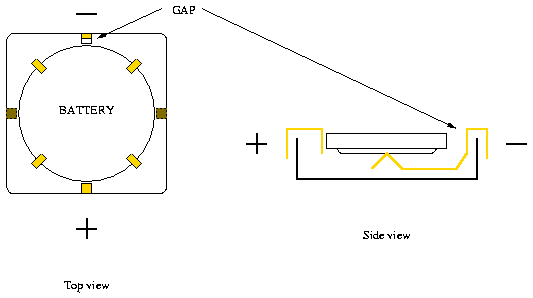
One of them is slightly set apart from the battery by a tiny gap. Do not stick a metal needle in that gap to apply leverage! That contact is the negative pole coming from underneath the battery (see side view), you would short-circuit the battery, possibly damaging it.
In my case the battery was good. I just removed it from the socket, cleaned it, cleaned the contacts on the socket and replaced it. Isopropyl alcohol and a cotton bud is all you need.
While at that you might want to check the connector contacts on the side of the camera (next to the zoom control). That's a special kind of connector made for this kind of printed cables that you should be familiar with if you want to mess with it. Don't try to simply pull the cable out of the connector as you may damage it.
When reassembling don't forget the battery door!
Copyright © Walter C. Pelissero, all rights reserved